
Secure web application with OAuth

OAuth is a standard for authenticating users. There are many third-party OAuth authentication service providers are available. In this post, we learn to create a web application which allows users to Login with there Twitter credentials. I am using Ktor to develop this application. This post assumes that users are having basic knowledge of OAuth and Ktor.
This whole project is available in Github
Below is the application preview of what we are going to develop in this port.
Create a host entry
While configuring OAuth, we need to provide redirect URLs that can’t be IP addresses or localhost. So for development purpose, we need to create a host which points to 127.0.0.1 in local. We can create a host by editing hosts file. You can choose any name for your local domain, but I am going to give it me.mydomain.com
Update hosts file by adding a new entry like shown below. You need root/admin access to edit this file.
127.0.0.1 me.mydomain.comIn Linux based operating systems this file exists at /etc/hosts and in Windows it exists at %SystemRoot%\System32\drivers\etc\hosts. Now having a new entry in the host file, we can access local machine using me.mydomain.com.
Create Twitter app
This Web application which we are developing in this post allows users to log in with there Twitter credentials. However, before that, we need to register our application with Twitter, and the below steps will help us in creating a new application with Twitter.
- Sign in to twitter developer account https://developer.twitter.com. Create a new account if not exists.
- Create a new app by clicking on Create an app button.
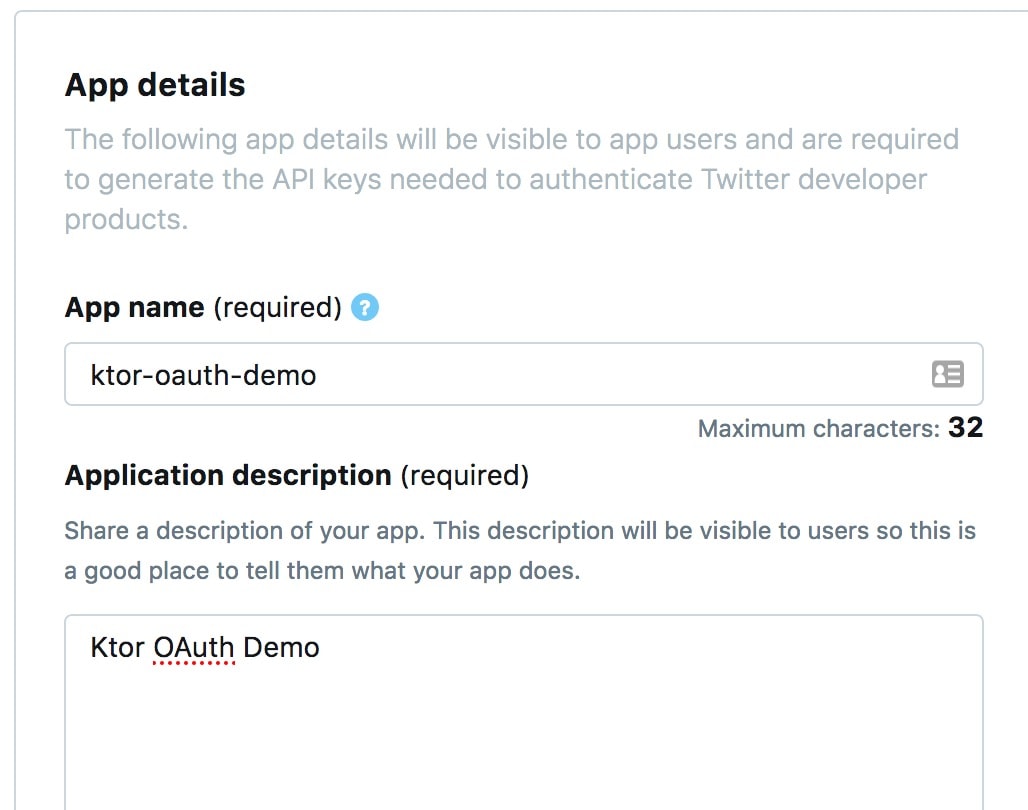
- Provide new app details like shown in below.
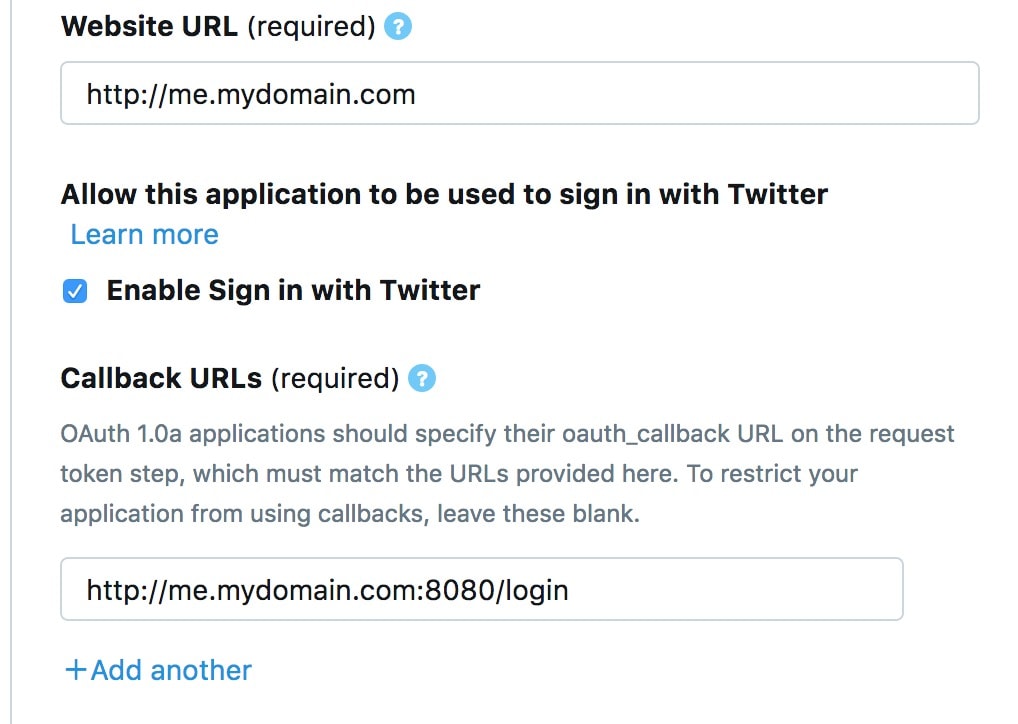
- Enter ‘Website URL’ and check ‘Enable Sign in with Twitter’ and then enter ‘Callback URLs.’ as shown in below image. When a user logs in successfully, then Twitter redirects to the given callback URL.
- Provide your application details in the final text area and then click on ‘Create.’ This action will create a new application.
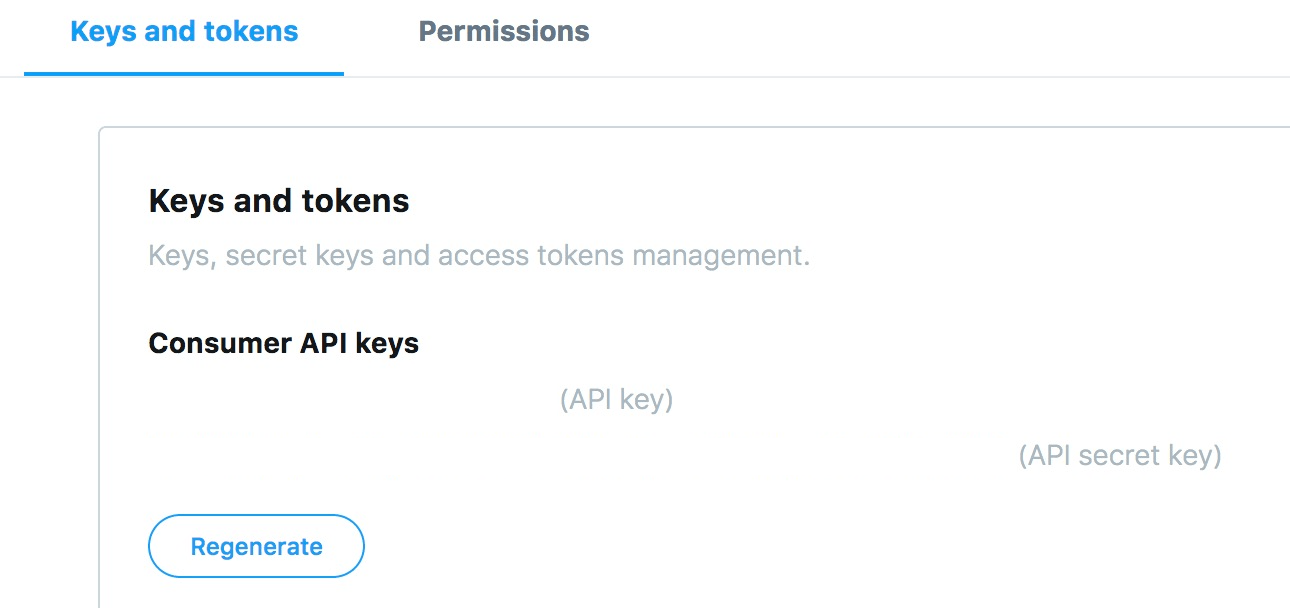
- Within the application details go to ‘Keys and Tokens’ tab. Here you see the generated Consumer API Keys. We are going to use these values in our application.
Create Kotlin project with Ktor
Execute below commands to create an empty gradle Kotlin project. Once the project is created then import it into your favorite editor.
mkdir ktor-oauth
cd ktor-oauth
gradle init --type kotlin-application

Select build script DSL:
  1: groovy
  2: kotlin
Enter selection (default: kotlin) [1..2]

Project name (default: ktor-oauth):
Source package (default: ktor.oauth): net.thetechstack
I executed this command on Gradle 5.2.1 version. You can choose to create kotlin project with any other build tool.
This command will create a new project with standard folder structure.
Add dependencies
Update build.gradle.kts to add below dependencies;
val ktor_version = "1.1.3"
dependencies {
  //ktor
  implementation("io.ktor:ktor-server-core:$ktor_version")
  implementation("io.ktor:ktor-server-netty:$ktor_version")
  implementation("io.ktor:ktor-jackson:$ktor_version")

  //ktor authentication
  implementation("io.ktor:ktor-auth:$ktor_version")

  //ktor HTTP client
  implementation("io.ktor:ktor-client-apache:$ktor_version")

  //ktor HTML builder for web pages
  implementation("io.ktor:ktor-html-builder:$ktor_version")

  //logging
  implementation("ch.qos.logback:logback-classic:1.2.3")
}
Coding
Let’s dive into the coding, the most fun part of this post :). This web application which we are developing contains four pages;
- Login: Page shows a Twitter link. When the first time user accesses this page, then the user needs to click this link, then the application redirects to Twitter.
- Main: Once user logs-in successfully then they land on this page. This page has two links; one for visit Setting page and other is to Logout.
- Settings: This page contains a link back to the Main page and a link to log out.
- Error: This page shows errors if any.
To make it simple, I code everything in a single Kotlin file. Its easier to read and can be used later for reference. Create App.kt in the project and update it with below code;
fun main() {
    embeddedServer(Netty, 8080) {
      ///code
    }.start(wait = true)
}
We created an embedded Netty server which runs on 8080.
Install features
Let’s customize Ktor framework by adding some required features like below;
- CallLogging: Logs all HTTP requests. This feature is useful for debugging.
- Sessions: We have multiple pages in our application. A user can navigate between Main and Settings pages, so the session helps in tracking the user state.
- Authentication: The Main motive for this post is to authenticate users, so we need this feature.
fun main() {
    embeddedServer(Netty, 8080) {
      val authOauthForLogin = "authOauthForLogin"
        install(CallLogging)
        install(Sessions) { // <1>
            cookie<MySession>("ktorOAuthSessionId", SessionStorageMemory()) {
                cookie.path = "/"
            }
        }
        install(Authentication) { // <2>
            oauth(authOauthForLogin) {
                client = HttpClient(Apache).apply {
                    environment.monitor.subscribe(ApplicationStopping) {
                        close()
                    }
                }
                providerLookup = {
                    OAuthServerSettings.OAuth1aServerSettings(
                            name = "twitter",
                            requestTokenUrl = "https://api.twitter.com/oauth/request_token",
                            authorizeUrl = "https://api.twitter.com/oauth/authorize",
                            accessTokenUrl = "https://api.twitter.com/oauth/access_token",

                            // update below values with your keys
                            consumerKey = "***",
                            consumerSecret = "***"
                    )
                }
                urlProvider = {
                    redirectUrl("/login")
                }
            }
        }
    }.start(wait = true)
}- <1> Session: In a web application we can maintain sessions in various ways, but in this application, we are using cookies. We can store cookies either at the client side or server side. Client-side is vulnerable for attacks so let’s store them at the server side in memory. Learn more about configuring sessions in this link.
- <2> Authentication: Since we are using Twitter as an authentication provider, so we need to pass OAuthAuthenticationProvider instance to ‘OAuth’ function. This instance needs three settings;
- client: We are using Apache HTTPClient. Our application connects to Twitter while authenticating users, so it needs an HTTP client for communication.
- providerLookup: Pass OAuthServerSettings instance. This instance contains some vital information related to the authentication service. These settings differ based on the service provider. In the code, I have given dummy text in consumerKey and consumerSecret, but you need to update these with your application-specific values from Twitter.
- urlProvider: Page to where the application redirects after authentication.
Configure routes
We need to configure multiple routes to navigate between the pages.
fun main() {
    embeddedServer(Netty, 8080) {
      //features
      routing {
            get("/") {
                call.loginPage()
            }
            get("/main"){
                if(call.sessions.get<MySession>() == null)
                    call.respondRedirect("/")
                else {
                    call.loggedInSuccessResponse()
                }
            }
            get("/settings") {
                if(call.sessions.get<MySession>() == null)
                    call.respondRedirect("/")
                else {
                    call.accountPreferences()
                }
            }
            get("/logout") {
                call.sessions.clear<MySession>()
                call.response.header("Cache-Control", "no-cache, no-store, must-revalidate")
                call.respondRedirect("/")
            }
            authenticate(authOauthForLogin) {
                route("/login/{type?}") { // Redirects to twitter for authentication
                    param("error") {
                        handle {
                            call.loginFailedPage(call.parameters.getAll("error").orEmpty())
                        }
                    }
                    handle {
                        val principal = call.authentication.principal<OAuthAccessTokenResponse.OAuth1a>()
                        if (principal != null) {
                            call.sessions.set(MySession(principal.extraParameters["screen_name"] ?: ""))
                            call.respondRedirect("/main")
                        } else {
                            call.loginPage()
                        }
                    }
                }
            }
        }
    }.start(wait = true)
}
Below is the list of routes we configured in our code;
- /: Display login page with a link to Twitter. A user needs to log-in before accessing other pages.
- /main: Main page, from here a user can navigate to settings or log out. Before the page gets loaded, we are checking if the cookie is not null
- /settings: This page contains links to main and log-out.
- /logout: Cleans the session and redirects to ‘/.’
- /login/twitter: Redirect to Twitter for authentication, and this route is within ‘authenticate’ call. call.authentication.principal makes HTTP call to the authentication service. The response of this call is saved in the principal which contains the user details and token. If the principal is found then redirects to /main page else to log-in page.
We completed configuring all routes, and there are some utility functions which I am using but not explained here. They are self-explanatory, please refer them in the project here.
Conclusion
We developed a simple kotlin project with Ktor and Authentication features to enable user to login with there Twitter credentials.