Create Maven project in GitHub
If you are looking to publish your first Maven project to gitHub then this article will help you to get started with that. I am going to explain the steps involved in creating a new maven project and pushing it to gitHub. Before creating local project its better to create empty repository in gitHub so we can later clone it.
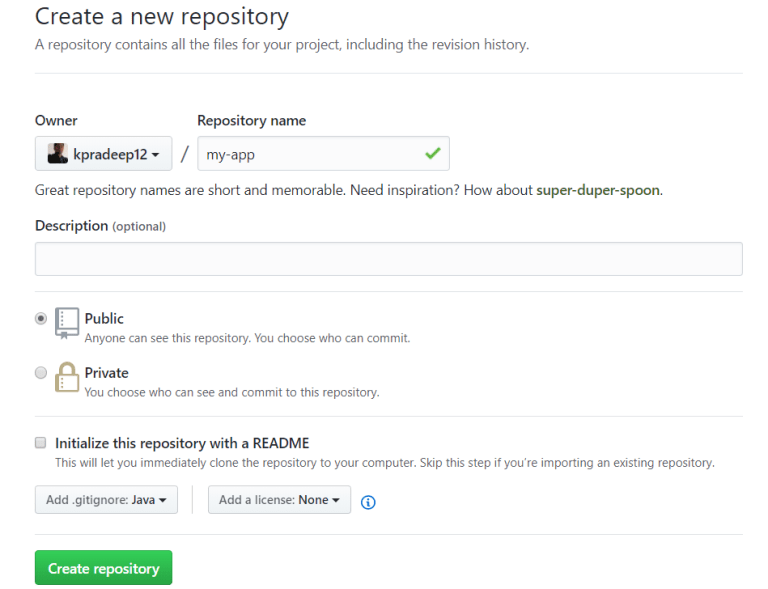
Create new repository in Github
- Login into your gitHub account and create new repository.

- Provide name for repository. I am providing name as ‘my-app’.

-
Select ‘java’ from ‘Add .gitignore’ dropdown. This will generate a default .gitignore file needed for a java project.
-
Click on ‘Create repository’ button. Empty repository will be created and in next section we will create Maven project.
Create new maven project in local
- Make sure you have java, maven and git installed in your local before proceeding further.
- Open command prompt (or terminal) and go to a folder where you want to create a new project.
- Execute below maven command. This command will create a simple Java project with in folder ‘my-app’. Note that this name should match with repository name in gitHub.
mvn -B archetype:generate -DarchetypeGroupId=org.apache.maven.archetypes -DgroupId=com.mycompany.app -DartifactId=my-app- Above command should show ‘BUILD SUCCESS’ message and it will create below files and folders:
- New folder ‘my-app’ (this is the same name we provided for repository in gitHub)
- pom.xml in my-app folder. This is the main maven file.
- Folders for java and test classes.
- New maven project is created.
Clone GitHub repository and merge with Maven project
- In github.com goto ‘my-app’ project.
- Click on ‘Clone or download’ drop-down and click copy icon next to repository web URL. This will copy URL into clipboard.

- Now we need to clone this project into our maven folder but git clone command will not work if already project folder exists. In our case we already created maven project folder so we will clone it into temp folder. I found this trick from this stack-overflow discussion.
- If you are in ‘my-app’ folder in CMD/termical then go to parent folder and execute below command. This command will clone gitHub repository into temp folder.
git clone <URL copied from gitHub> temp- In temp folder you should see .git and .gitignore files downloaded. These are hidden files.
- Now copy .git and .gitignore from temp into my-app folder and then remove temp folder by executing below commands
Use below commands in Windows command prompt
xcopy /S/H/Y temp my-app
rmdir temp /S/Q

Use below commands in Mac terminal
cp -a temp/. my-app/
rm -rf temp- You should see .git, .gitignore, src and pom.xml files in my-app folder.
- Now we have maven project with git. In next section we will see how to do first commit and push to gitHub repository.
Commit and push to gitHub repository
- ‘git status’ command in gitHub project will show current check-in status of the files so execute ‘git status’ in root folder of the project.
my-app $ git status
On branch master
Your branch is up-to-date with 'origin/master'.
Untracked files:
  (use "git add <file>..." to include in what will be committed)

	pom.xml
	src/

nothing added to commit but untracked files present (use "git add" to track)- This command shows that pom.xml and src is not yet committed, so execute ‘git add -A’ this will add all new files to staging.
- Now again check the status ‘git status’
my-app $ git status
On branch master
Your branch is up-to-date with 'origin/master'.
Changes to be committed:
  (use "git reset HEAD <file>..." to unstage)

	new file:   pom.xml
	new file:   src/main/java/com/mycompany/app/App.java
new file: src/test/java/com/mycompany/app/AppTest.java- This time it shows all files are in staging and ready to be committed.
- Execute ‘git commit -m “initial project setup”‘ this command will commit all staged files to local gitHub repository. We are also providing comment for all these files with -m option.
my-app $ git commit -m "initial project setup"
[master e719d11] initial project setup
 3 files changed, 69 insertions(+)
 create mode 100644 pom.xml
 create mode 100644 src/main/java/com/mycompany/app/App.java
create mode 100644 src/test/java/com/mycompany/app/AppTest.java- All files are checked into local repository. Now lets push them to remote gitHub repository. Execute ‘git push origin master’
my-app $ git push origin master
Counting objects: 16, done.
Delta compression using up to 4 threads.
Compressing objects: 100% (6/6), done.
Writing objects: 100% (16/16), 1.51 KiB | 0 bytes/s, done.
Total 16 (delta 0), reused 0 (delta 0)
To https://github.com/kpradeep12/my-app.git
62985a4..e719d11 master -> master- Go to gitHub repository and you should see all your maven files uploaded there. Now any one can work on this repository. If you want to pull all new changes from remote to local repository then execute ‘git pull –all’
Now we have a full maven project setup with gitHub integration. This project is ready to be imported into any of your favorite IDE.
