
Create Web Application With Ktor

Its easy to develop a web application using Ktor, In this article I am going to explain the tools we need and the steps for developing a small CRUD based web application using Ktor. I will take Employee entity as an example to demonstrate this application. We are going to use below frameworks/libraries.
- Ktor framework: Develop asynchronous servers and clients.
- FreeMarker: Template engine to generate text output. We are using it for HTML pages.
- H2 database: In-memory and very fast database.
- Exposed SQL library: Light weight library for database access.
If you are new to Exposed and Ktor framework then please go through below series of articles. These articles will explain them in more details.
We are going to develop web pages using Freemarker and these pages will perform add/edit/delete operations on the employee entity. Lets get started.
- Create Kotlin project
- Add and configure Ktor framework
- DAO layer for database
- Configure FreeMarker
- Conclusion
Please note that this whole project is available in github
Create Kotlin project
Execute below command to create an empty gradle Kotlin project. Once the project is created then import it into your favorite editor.
mkdir ktor-rest
cd ktor-rest
gradle init --type kotlin-application

Select build script DSL:
  1: groovy
  2: kotlin
Enter selection (default: kotlin) [1..2]

Project name (default: ktor-rest):
Source package (default: ktor.rest): net.thetechstack
I executed this command on Gradle 5.2.1 version. You can choose to create kotlin project with any other build tool.
This command will create new project with standard folder structure with default App.kt file.
Add and configure Ktor framework
Adding Ktor framework to the project is easy, just add below dependencies to your build.gradle
val ktor_version = "1.1.3"

dependencies {
    //..
    implementation("io.ktor:ktor-server-core:$ktor_version")
    implementation("io.ktor:ktor-server-netty:$ktor_version")
    //Add logging support
    implementation("ch.qos.logback:logback-classic:1.2.3")
}
Configure Netty embedded server
Go to App.kt and update it with below code.
package net.thetechstack

import io.ktor.application.install
import io.ktor.features.CallLogging
import io.ktor.features.ContentNegotiation
import io.ktor.server.engine.embeddedServer
import io.ktor.server.netty.Netty

fun main() {
    embeddedServer(Netty, port = 8080){ }.start(wait = true)
}
embeddedServer function will initiate and run the embedded server and we passed below arguments to it;
- Server instance type; We passed Netty. Ktor support Jetty and Tomcat as well.
- Port number on which the server will listen.
- Lambda instance of Application. Right now it is empty but we will add more details to it in next sections.
DAO layer for database
We are using Exposed to connect and perform SQL operations on H2 in-memory database. We need to include required dependencies in the build.gradle so go to build.gradle and add below dependencies.
dependencies {
    //...
    implementation("org.jetbrains.exposed:exposed:0.12.1")
    // H2 in-memory database
    implementation("com.h2database:h2:1.4.191")
    // Exposed depends on Joda-time so include it
    implementation("joda-time:joda-time:2.9.2")

}
To learn more about SQL library Exposed please read this article
Create Model and Mapping
We are using Employee entity as an example so lets create a new package net.thetechstack.model and add Employee.kt with below code.
package net.thetechstack.model

data class Employee(val id: Int, val name: String,
                    val email: String, val city: String)
This is a simple data class with four fields. We want to maintain id, name, email and city for the Employee so the constructor needs all these values.
Create a new package net.thetechstack.dao and add Employees.kt file with below content;
import org.jetbrains.exposed.sql.Table

object Employees: Table(){
    val id = integer("id").primaryKey().autoIncrement()
    val name = varchar("name", 50)
    val email = varchar("email", 100)
    val city = varchar("city", 50)
}
Employees is the mapping object for Employee. This object will give enough information for Exposed to map fields with the database table. This object acts like a object to table relational mapping.
Create DAO
Instead of directly performing database operations we are creating DAO layer. DAO (Data Access Layer) will wrap all database operations in it. Create DAOFacadeDatabase.kt file in net.thetechstack.dao package with below code.
package net.thetechstack.dao

import net.thetechstack.model.Employee
import org.jetbrains.exposed.sql.*
import org.jetbrains.exposed.sql.transactions.transaction
import java.io.Closeable

interface DAOFacade: Closeable{
    fun init()
    fun createEmployee(name:String, email:String, city:String)
    fun updateEmployee(id:Int, name:String, email:String, city:String)
    fun deleteEmployee(id:Int)
    fun getEmployee(id:Int): Employee?
    fun getAllEmployees(): List<Employee>
}
We created an interface, this defines the contract for DAO layer. We added all the methods needed to perform CRUD operations. With in the same class lets implement this interface.
class DAOFacadeDatabase(val db: Database): DAOFacade{

    override fun init() = transaction(db) {
            SchemaUtils.create(Employees)
            //Initial data
            val employees = listOf(Employee(1, "Owlette","owlette@techstack.net", "New York"),
                    Employee(2, "Catboy","catboy@techstack.net", "New York"),
                    Employee(3, "Grekko","grekko@techstack.net", "New York"))
            Employees.batchInsert(employees){ employee ->
                this[Employees.id] = employee.id
                this[Employees.name] = employee.name
                this[Employees.email] = employee.email
                this[Employees.city] = employee.city
            }
            Unit
        }
    override fun createEmployee(name: String, email: String, city: String) = transaction(db) {
            Employees.insert {it[Employees.name] = name;
                it[Employees.email] = email; it[Employees.city] = city;
            }
            Unit
        }
    override fun updateEmployee(id: Int, name: String, email: String, city: String) = transaction(db) {
            Employees.update({Employees.id eq id}){
                it[Employees.name] = name
                it[Employees.email] = email
                it[Employees.city] = city
            }
            Unit
        }
    override fun deleteEmployee(id: Int) = transaction(db) {
        Employees.deleteWhere { Employees.id eq id }
        Unit
    }
    override fun getEmployee(id: Int) = transaction(db) {
            Employees.select { Employees.id eq id }.map {
                Employee(it[Employees.id], it[Employees.name], it[Employees.email], it[Employees.city]
                )
            }.singleOrNull()
        }
    override fun getAllEmployees() = transaction(db) {
        Employees.selectAll().map {
            Employee(it[Employees.id], it[Employees.name], it[Employees.email], it[Employees.city]
            )
        }
    }
    override fun close() { }
}
DAOFacadeDatabase needs Database instance. We wrapped all query statements with in the transaction because Exposed needs all the database operations to be performed with in a transaction.
To understand more about Exposed please read this article
Now we have our DAO layer ready.
Integrate Exposed with Ktor
Lets integrate DAO layer with Ktor. We need to instantiate DAOFacadeDatabase by passing H2 in-memory database instance. Update Application.kt with below code;
val dao = DAOFacadeDatabase(Database.connect("jdbc:h2:mem:test;DB_CLOSE_DELAY=-1", driver = "org.h2.Driver"))
fun main() {
    embeddedServer(Netty, port = 8080){
        dao.init()
    }.start(wait = true)
Instantiated DAOFacadeDatabase by passing H2 database instance and used this instance to create the tables by calling init()
Configure FreeMarker
Update build.gradle with below dependency to add support for FreeMarker templates;
dependencies {
    // ...
    implementation("io.ktor:ktor-freemarker:$ktor_version")
}
We will save all our FreeMarker templates in resources/templates directory so create this directory under ktor-freemarker/src/main/
embeddedServer(Netty, port = 8080){
        dao.init()
        install(FreeMarker){
            templateLoader = ClassTemplateLoader(this::class.java.classLoader, "templates")
        }
    }.start(wait = true)
We installed FreeMarker feature on the request and response pipeline by passing FreeMarker configuration to install function. We are going to save all our FreeMarker templates in templates folder so we passed this to FreeMarker configuration. Now FreeMarker will check templates in src/main/resources/templates folder
Create templates
We need three template files;
- template.ftl: This is the base template of our application. This contains the page layout.
- index.ftl: Main page with list of all employees and gives options to add/edit/delete employees.
- employee.ftl: Allows us to add/edit employee.
template.ftl
<#macro mainLayout title="Welcome to Employee Database">
<!doctype html>
<html lang="en">
    <head>
        <title>${title}</title>
        <!-- Required meta tags -->
        <meta charset="utf-8">
        <meta name="viewport" content="width=device-width, initial-scale=1, shrink-to-fit=no">
        <!-- Bootstrap CSS -->
        <link rel="stylesheet" href="https://stackpath.bootstrapcdn.com/bootstrap/4.1.3/css/bootstrap.min.css" integrity="sha384-MCw98/SFnGE8fJT3GXwEOngsV7Zt27NXFoaoApmYm81iuXoPkFOJwJ8ERdknLPMO" crossorigin="anonymous">
    </head>
    <body>
    <div class="container">
        <div class="row m-1">
            <h3>Employees</h3>
        </div>
        <div class="row m-1">
            <#nested/>
        </div>
    </div>
    </body>
</html>
</#macro>
This is a simple HTML page uses Bootstrap CSS for styling and has some FreeMarker directives macro and nested.
Macro is used to store reusable templates and we can give it a name to refer them later. In below code I created a macro with named test. This macro contains reusable block, in this case it is having Hello with in p tag. If I want to output Hello then we call this macro <@test/> then the macro will be executed. Below code will output ‘Hello’ two times.
<#macro test>
    <p>Hello</p>
</#macro>

<@test/>
<@test/>
Macro can take input parameters and we can use them with in the template.
<#macro test name>
    <p>Hello ${name}</p>
</#macro>

<@test name="World"/>
<@test name="FreeMarker"/>
More information on the macro is available on the FreeMarker site.
Instead of Macro having its own content we can pass content to it using Nested. Macro acts like a border around the nested. In below example we are passing ‘Hello’ to it and macro will replace <#nested> with the content.
<#macro test>
    <#nested>
</#macro>
<@test><p>Hello</p></@test>
In template.ftl we uses macro and nested to define our web page structure. We called our macro as mainLayout now we can use this in other template files.
index.ftl
<#import "template.ftl" as layout />
<@layout.mainLayout>
    <table class="table">
        <thead class="thead-dark">
            <tr>
                <th scope="col">Id</th>
                <th scope="col">Name</th>
                <th scope="col">Email</th>
                <th scope="col">City</th>
                <th></th>
            </tr>
        </thead>
        <tbody>
            <#list employees as emp>
            <tr>
                <td>${emp.id}</td>
                <td>${emp.name}</td>
                <td>${emp.email}</td>
                <td>${emp.city}</td>
                <td>
                    <a href="/employee?action=edit&id=${emp.id}" class="btn btn-secondary float-right mr-2" role="button">Edit</a>
                    <a href="/delete?id=${emp.id}" class="btn btn-danger float-right mr-2" role="button">Delete</a>
                </td>
            </tr>
            </#list>
        </tbody>
    </table>
    <div class="container">
        <div class="row">
            <a href="/employee?action=new" class="btn btn-secondary float-right" role="button">New Employee</a>
        </div>
    </div>
</@layout.mainLayout>
We imported template.ftl as layout and used it in index.ftl. In this page we display all employees and allows users to add/edit/delete employees. list directive will allow us to iterate employees. To add/edit we are passing action query parameter and for delete we are passing id
employee.ftl
<#import "template.ftl" as layout />
<@layout.mainLayout title="New Employee">
    <form action="/employee" method="post">
        <div class="form-group">
            <label for="name">Name</label>
            <input type="text" class="form-control" id="name" name="name" placeholder="Enter Name" value="${(employee.name)!}">
        </div>
        <div class="form-group">
            <label for="email">Email</label>
            <input type="email" class="form-control" id="email" name="email" placeholder="Enter Email" value="${(employee.email)!}">
        </div>
        <div class="form-group">
            <label for="city">City</label>
            <input type="text" class="form-control" id="city" name="city" placeholder="Enter City" value="${(employee.city)!}">
        </div>
        <input type="hidden" id="action" name="action" value="${action}">
        <input type="hidden" id="id" name="id" value="${(employee.id)!}">
        <button type="submit" class="btn btn-primary">Submit</button>
    </form>
</@layout.mainLayout>
This template is for new/edit employee records. action field in the form is used to maintain the type of action and id contains the employee id which server can use to update it. On submit form will be submitted to /employee.
Declare controllers
Update App.kt with below code to create HTTP end-points.
embeddedServer(Netty, 8080){
        // ..
        routing {
            route("/"){
                get{
                    call.respond(FreeMarkerContent("index.ftl", mapOf("employees" to dao.getAllEmployees())))
                }
            }
            route("/employee"){
                get {
                    val action = (call.request.queryParameters["action"] ?: "new")
                    when(action){
                        "new" -> call.respond(FreeMarkerContent("employee.ftl",
                                    mapOf("action" to action)))
                        "edit" -> {
                            val id = call.request.queryParameters["id"]
                            if(id != null){
                                call.respond(FreeMarkerContent("employee.ftl",
                                        mapOf("employee" to dao.getEmployee(id.toInt()),
                                                "action" to action)))
                            }
                        }
                    }
                }
                post{
                    val postParameters: Parameters = call.receiveParameters()
                    val action = postParameters["action"] ?: "new"
                    when(action){
                        "new" -> dao.createEmployee(postParameters["name"] ?: "", postParameters["email"] ?: "", postParameters["city"] ?: "")
                        "edit" ->{
                            val id = postParameters["id"]
                            if(id != null)
                                dao.updateEmployee(id.toInt(), postParameters["name"] ?: "", postParameters["email"] ?: "", postParameters["city"] ?: "")
                        }
                    }
                    call.respond(FreeMarkerContent("index.ftl", mapOf("employees" to dao.getAllEmployees())))
                }
            }
            route("/delete"){
                get{
                    val id = call.request.queryParameters["id"]
                    if(id != null){
                        dao.deleteEmployee(id.toInt())
                        call.respond(FreeMarkerContent("index.ftl", mapOf("employees" to dao.getAllEmployees())))
                    }
                }
            }
        }
}.start(wait = true)- /: Loads index.ftl by setting all employees in employees key. We use this key in the template to iterate and display all employees in the HTML table.
- /employee:
- GET: Loads employee.ftl. To handle edit we fetch the employee record and set it in the map.
- POST: Loads index.ftl after the action. new will create new employee and edit will update the record.
- /delete: Deletes employee and loads index.ftl
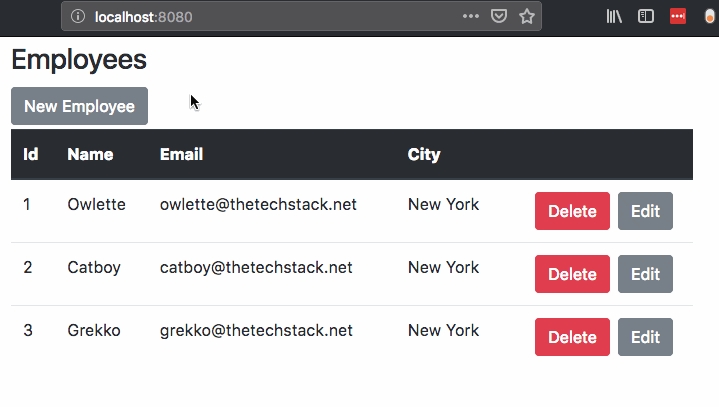
Below is the demo run of the application.
Conclusion
We developed a simple web application using Ktor framework and used many other libraries to perform CRUD operations on an entity.