
Spring Security Introduction
Security is an essential part of any application because it will protect the application from intruders. Spring Security is one of the projects in the Spring suite. This project will help us to secure our application. As a developer, we need to learn how this framework works internally and understand configuring it.
Some of the use-cases where we can use Spring security;
- Restricting access to REST endpoints to only authenticated users
- Load web pages only after users logs-in using the login form.
- Before authentication, load the user from a database or any other third-party application.
This guide will explain all essential parts of the Spring Security. We will try to create a project and understand how this framework will work. Before we dig into the framework details, let’s create a project and analyze the default behavior.
Spring Security Project Setup
Follow the below instructions to create a spring project;
- Go to https://start.spring.io/
- Select your own choice of configuration (Project, Language, Spring Boot, Project Metadata, Packaging, and Java version) prefer to use Java 11 or higher.
- Select below dependencies;
- Spring Web
- Thymeleaf
- Spring Security
- Click on Generate to download this spring project. Open it in your favorite Java editor.
You can also download this project from Github here .
Now we have our base project ready. Let’s add some files to it. Before that, let me explain what we are going to do. This project will greet the logged-in user with a message Welcome <user name>! on the web page. To implement this, we need to create two files; Java controller and Thymeleaf HTML template file.
Create a new Java file called GreetingsController.java. Make sure to create this file either at the same package level where your SpringBootApplication class is or create it under a sub-package from it.
@Controller
public class GreetingsController {
  @GetMapping("/greeting")
  public String all(Model model, Principal principal) {
    model.addAttribute("userName", principal.getName());
    return "greeting";
  }
}
It is a simple class with a single method in it. We annotated this class with @Controller. @Controller annotation is a Spring stereotype annotation; By declaring this class with @Controller, we tell Spring that this is a Web controller, which means Spring will direct HTTP requests to this class. We declared a method with @GetMapping(“/greeting”) annotation in this class. This method will handle the GET HTTP requests on /greetings endpoint. Spring will invoke this method when a user hits this endpoint.
We need to pass the user name to the Thymeleaf HTML file because we need to greet the user; we can do this using Model and Principal objects. Spring can provide these objects to us, so we declared our method with these two arguments.
Model is a key-value object store; we can use this as an intermediary store between the controller and Thymeleaf template. In the Thymeleaf template, we can extract the values from this store. Principal contains the logged-in user name.
We are getting username from the Principal object and setting this value in the Model under a key userName. Now, we can extract the value of userName in the template.
Let’s create a Thymeleaf HTML template file greeting.html under resources/templates folder and copy below content in it.
<html>
  <body>
    <h2>Welcome <span th:text="${userName}"></span>!</h2>
  </body>
</html>
It is a simple, self-explanatory file. Only the thing you need to understand is the Thymeleaf attribute th:text, we passed a value to this attribute ${userName}, this value represents the key in Model object. Thymeleaf will extract the value of userName from the Model and places it in the <span> tag.
Now we are done with the coding. Let’s run the Spring application. In your editor, open the main Spring boot class; usually, it is annotated with @SpringBootAppliation and run it.
Spring will use 8080 as the default port. You can change it by updating server.port in application properties.
Go through the application startup logs and make sure no errors. Now open a new tab in the browser and hit http://localhost:8080/greeting . You will see a login page, it asks for the user name and password. Spring Boot identified that we have Spring Security as a dependency, so Spring configured default security for us.
As part of the default security configuration, Spring will secure all the endpoints and creates a default user. If we try to access any endpoint, Spring will redirect us to a login page to enter the credentials. Once the credentials are entered, then the page will be served.
Without configuring any security and just adding a security dependency, our application is secured, isn’t it great? By default, Spring configures basic authentication, means the user needs to provide a user name and password for authentication.
As I mentioned earlier, Spring security will create a User for us, right? So the default user name is user, and the random password will be printed on the console. With in the application startup logs, look for the password. Now go back to the browser and enter credentials, user name as user and password copied from the console.
Now you will see HTML page with the message saying Welcome user! As I said earlier, user is the user’s default name, which Spring security will create for us.
We successfully created a web application with Spring Security, and we secured our web pages. We not at all configured anything, and our application is already secured. Let’s see what’s happening behind the scenes.
Behind the scenes
There are a lot of things happening behind the scenes. Whenever a user sends an HTTP request, then the request will pass through some stages. These stages will help Spring to authenticate and authorize the user and store the user information in the security context. Go through the below steps to understand what happens when an application received an HTTP request.
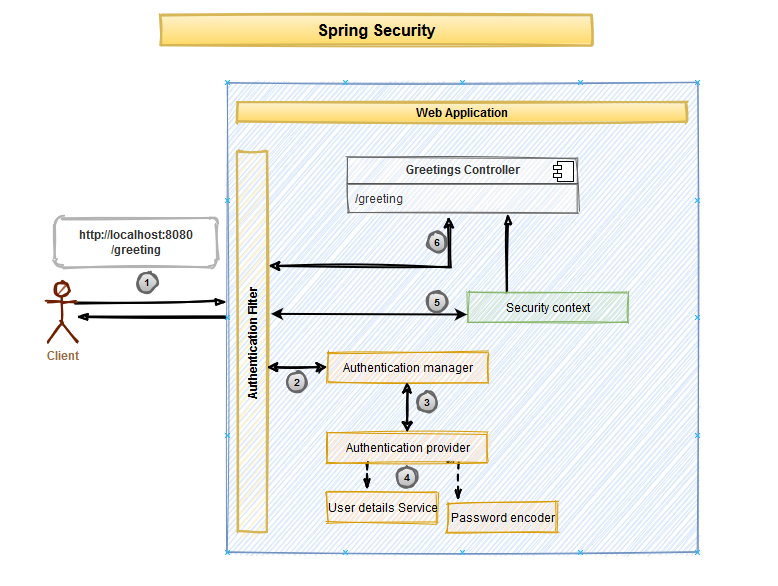
- Application users will request a web page by making an HTTP request.
- Spring Security will configure a default Authentication Filter, and all the HTTP requests will pass through this filter. Authentication filter will forward this request to the Authentication Manager. Authentication manager will, in turn, forwards the request to an Authentication Provider.
- It is the responsibility of the Authentication provider to authenticate the user. It will use the User details service to fetch the user information and Password encoder to encode the password to authenticate a user.
- User details service will provide the user information. It means whatever the user name mentioned on the login page is validated against the user repository. Because we used the default Spring security configuration so only the user available is user, and it is saved in In-Memory. A Password encoder is used to encode the password. It is not recommended to validate the password with the raw password. In the user repository, we need to encrypt the password before storing it, and at the time of authentication, we need to decode it before comparing the password.
- If the Authentication provider successfully authenticates the user, then Spring will save the user details in the security context. It is a store where Spring security will save user details until the request is complete.
- Controller can access the authenticated user information, and it can return the response to the user.
Above flow is very high level but very important to understand how Spring security will work. We didn’t configure anything in our project, but Spring created default user details and password encoder. When we requested a web page at /greeting, Spring verified if a user is authenticated, and if not, it provided us with a default login page. After we provided the credentials, Spring authenticated with default user details and password encoder, and if successful, then saved the user details in the security context.
As I mentioned earlier, Spring will configure only one user called user. If we provide wrong credentials, then authentication will fail, and the page is not served.
In this section, we learned how spring security would authenticate users. In the next section, we will see how to configure User details.